| Dieser Text ist zur Referenz. Der Text betrifft nicht die aktuelle CGoban / KGS- Version, was bedeutet, das eventuell einige Funktionen und Optionen nicht mehr wie beschrieben funktionieren. Wenn du Interesse hast, ihn zu übersetzen, dann lies bitte die Infoseite für Editoren und Übersetzer (betrifft die deutsche Übersetzung: oder setz dich mit mir in Verbindung. RuediRf). |
This english text is for reference. Be aware, that this text was written for an older version of the KGS-client. Some functions and options possibly don't work as described. If you are interested to translate this text to your language, please read the, 'help editors' page. |
 Teaching with KGS
Sorry, there are not yet many pictures here. I'll try to get them.
KGS was designed from the very beginning to be the best server for
teaching go over the internet. Anybody on KGS can teach, but learning how
to use the KGS teaching tools best can take some time!
This guide assumes that you already know your way around KGS; if you don't,
then log in and try playing a few games and chatting some. Then come back and
read here.
Parts of the Teaching System
When you are teaching, running a study group, or studying on your own on KGS,
you usually don't use a normal game. Instead, you need an editable
game, which adds extra ability to change the board. This page and
the ones it links to explain the extra abilities available in editable games
and how to use them. It is important that you read the first three
pages given below; they contain information that is necessary to make sense
of the editing and teaching system. After you read them, try them out.
Then, when you need to or want to, read about moderation and live audio.
They both require that you be authorized for teaching on KGS, and give
abilities useful when you are teaching to a group or running a study
group.
- The different roles people can have
in a teaching game
- In a normal game, there are two "roles" people have: a player, or an
observer. In any editable game, the roles are different; there is a
game owner, and player with editing control, and the rest of the players
are observers. Editing control may be passed from one player to another.
This page explains what these roles mean and how to use them.
- The editable game types
- When you are teaching on KGS, you have different game types used for
different types of lessons. There are demonstration games, review games,
uploaded games, cloned games, and teaching games. That page explains the
differences between them and tells you how to set each up.
- The editing tools
- The KGS editing tools are used to put marks on the board, set up
positions, etc. Knowing how to use them well is necessary to doing any
teaching.
- The moderation system (only for people
with special teaching accounts [it seems, that some part of it also work without teacher account])
- The moderation system lets you control who talks and who sees it. It is
useful when you are teaching large groups; without using moderation, there
is often so much chatter that it is difficult for students (and for you)
to tell what is going on.
- The live audio system (only for people with special
teaching accounts)
- The live audio system lets a teacher talk into a microphone; all the
students will hear. The students can then type their answers back to the
teacher.
Editing Roles
To prevent lessons and study groups from collapsing in confusion as
multiple people try to make changes to the game board, every editable game
has two special roles: the game owner, and the player (pupil, observer) with editing control.
Game Owner
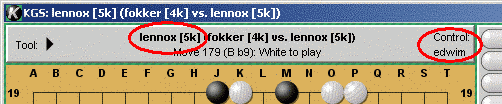
Game title, showing the owner (here lennox) and
the person with editing control (here edwim)
Every editable game has exactly one game owner. The player who set up the game is always the game owner. See the list of editable game types for information on how to set up an editable game and be the game owner. You can always tell who the game owner is by looking at the title of the game; the game owner will be the first name in the title (see the image to the right). The game owner has several abilities:
- The game owner can, at any time, take editing control, or assign editing
control to somebody else. See the editing control
section for more information on what this means and how to do it.
- If the game is a teaching
game, then the game owner may choose when to switch between play mode
and editing mode of the game.
- If the game owner is an authorized teacher, then the game owner may
use their microphone to turn on live audio.
- If the game owner is an authorized teacher, then the game owner may
turn on moderation mode and manage the
comments that people see.
If the game is to be a lesson with a teacher and one or more students, the
teacher should probably set up the game and become the owner.
This will let the teacher take control over editing and
make changes at any time. Otherwise, the teacher may have to stop to
ask for editing control, which can slow the lesson down.
Editing Control
Same game title as above, editing control has ...
At any given time, there is only one player with editing control. It may
be the game owner who has editing control, or it may be another player. Only
the player with editing control may make changes to the game board.
You can tell who has editing control by looking at the upper right
of the game board (see the image to the right). The
player with editing control may use the editing
tools and may also give editing control to another player. If you
give editing control to another player, you no longer have it, and may not
make changes on the board any more.
If you are the owner, you may take editing control at any time by
choosing the "Take Control" option in the "tools" menu (see the
image to the right). Other players must be given editing control, either
by the game owner or by the player who currenly has editing control.
If you either are the teacher or have editing control and you want
to give it to somebody else, there are two ways to do this:
- The easiest
is to use the "Give control to..." menu option under the tools menu. See
the upper image to the right. This option will always hold either the game
owner, or the player who had editing control just before you.
-
If you want to give editing control to somebody other than the player who
is in the tools menu, you must find the player in the user list,
right click on theier name, then select "Give Control" in the
menu that appears. See the screen shot to the right for an example.
The KGS Moderation System
some parts of this may also be used without special teaching account
(Text from another page:) Everyone can teach on KGS, but special moderation and teaching options are only available for those with a teacher account: audio sending and moderation of comments in any of the editable game types (demo, review, teach, cloned, uploaded).
The moderation system is designed to make it possible for teachers to
manage very large classes. When the number of students gets large, it
becomes difficult to manage the chat; what the teacher writes can easily
be drowned out by all of the chatter from the students, or if the teacher
wants to address only some of the comments or questions, it can be difficult
for students to tell which of all the comments is being answered.
A typical use of moderation would be for the teacher to demonstrate something,
then ask (using live audio or typing), "Any
questions?". The students all type their questions; the teacher then selects
a few to show to the students and answer. So the students will not see
the questions that their teacher chooses not to answer, keeping the game
chat very clean and understandable.
Moderation can be used in any of the
editable game types. The teacher must have
an authorized teaching account.
Students
The students in a moderated game will see several differences. First, when
moderation is turned on (or when they join the game), the text "(Moderated
Chat)" will appear in their chat window. While the game is in moderated
mode, anything that they type will be dim on the screen, with "(Moderated)"
in front of it (see the example here).
The student will not see any comments from other students unless the
teacher chooses to show the text; comments that the teacher has chosen to
display are shown in black. If your own text is chosen by the teacher, then
you will see it twice - once in grey with "(Moderated)" in front of it,
then a second time in black after the teacher has chosen to show it.
Teachers
Turning on Moderated Mode
First, you must create a game that is one of the
editable game types. Once you create the game, it will always start out in normal (non-moderated) mode. To
switch to moderated mode, go to the "Tools" menu in the upper left corner of the game window, and click the "Quiet" menu option to check its checkbox (see the image to the right).
When you want to turn moderation off and go back to normal chat, just go
back to the tools menu, and uncheck the box next to the "Quiet" menu
option. Chat will go back to normal, with every student hearing everything
that the other students say.
Using Moderation
Once the moderated mode is turned on, the chat box of the game window will
have two tabs added to the top of it. One will be labelled "game chat," the
other will be "moderation" (see the example here). The "game chat" tab is
much like a normal chat box for a game; anything that you type at the
bottom will be seen by all students, and above that you see everything
that the students have seen.
To see the comments that students are sending you, click the "Moderation"
tab. The game chat disappears; the entry field where you can type comments
disappears as well. It is replaced by the text coming from students,
a "Pause" checkbox, and an "Accept" button (see the illustration).
Here all the comments from students are visible. You can browse as you
want, reading as many (or as few) comments as you want. If the comments
are coming too fast and you can't keep up, check the "pause" checkbox.
This will stop the comments from coming in. To start accepting new
comments again, simple uncheck the "pause" checkbox. Note: Students
will not know that you have paused the chat, and can continue to send you
messages.
If you find a question or comment that you want everybody to see, you can
either double click on it, or click it once and press the "accept" button.
The comment will appear gray in the moderation box, and will appear both
in your "Game Chats" box and in in the chat box for all your students.
You can turn moderation on and off as you wish. It is up to you to judge
whether the free-for-all nature of normal mode or the more controlled
moderated mode is best at any give time.
KGS Live Audio
Using Audio sending features is restricted to users with an authorized teacher account.
KGS supports adding audio channels to teaching games. When this is
done, it makes one-way communications; anything that the teacher says,
the other players in the game can hear. This is an excellent way for
teachers to hold group lessons; they can talk, and students can type
back any questions.
Listening to Live Audio Games
All you need is to have sound enabled on your system. There is a
checkbox in the preferences window that lets you turn off audio comments;
make sure that this is turned on! Make sure that your speakers are
connected and turned on! Then you should be ready to go.
Note: On some systems, especially Linux, java does not interact
well with other programs that need to play sounds (see also in the FAQ). If you do not hear
sounds, or if your KGS client freezes when it tries to play a sound, try
completely closing all other sound-using applications (including your
KGS client). Then try restarting the KGS client and see if that solves
the problem. Later versions of java are better in this way, so you may want
to try upgrading your Java installation.
Setting up Live Audio Games
Only players with a "teacher" authorized account may set up live audio
games. If you need your account to be changed in this way, please contact
admin@gokgs.com. Once your
account
is properly configured, you must have a microphone connected to your computer.
Once you meet those two requirements, you are ready to start! First you must
test your microphone, then you must create the game, then you must
turn on audio in the game.
Testing the Microphone
The "Test Microphone" button
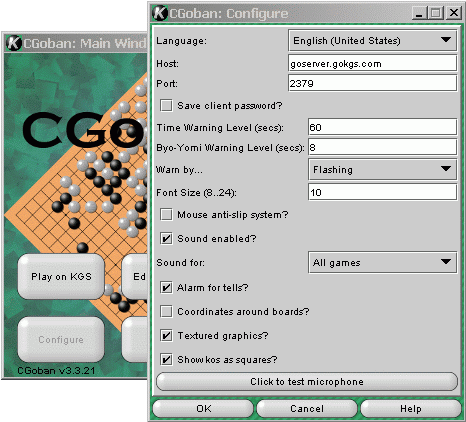
Testing the microphone is done by starting CGoban and pressing the
"Configure" button (see picture left). This will open up
your configuration window; at the bottom is a button to test the
microphone . Clicking that opens up the
"Microphone Test" window (see the bottom picture).
Help for Testing the Microphone
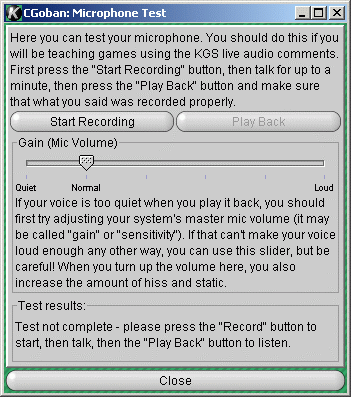
The "Microphone Test" window
Once the "Microphone Test" window is open, you can see the controls to test
your microphone.
This system works by recording you talking, then playing it back to you;
if you hear yourself after testing, then you know that all is working well!
Follow these steps:
- Make sure your microphone and speakers or headphones are connected
properly to your computer.
- If possible, open up your operating system's "sound mixer" or "audio level"
tool, and make sure that your microphone's volume or gain is set as high as
possible. (Exactly how to do this depends on your operating system. If you
can't find the tool, then don't worry; using it will let your students hear
your voice more clearly, but usually your micrphone will work without using
this tool).
- Now, press the "start recording" button in the "Microphone test" window.
Talk into your microphone for a little bit; just saying a sentence or two
should be enough!
- Once the "start recording" button has been pressed, the "play back"
button will become usable. When you have finished talking, press "play
back."
- When you press "play back," two things will happen: the bottom "Test
results" section of the "Microphone test" window should change, and you should
hear your own voice! If you don't hear your voice, or if the "play back"
button doesn't become enabled, then "Test results" should give you a hint
about where the problem is.
- If you heard your voice, but it was too quiet (or too loud), then
adjust the "Gain" lever (in the middle of the "Microphone Test" window) and
repeat steps 3 and 4. Keep doing this until the volume of your voice sounds
about right to you.
Once you have completed these steps, you are ready to go! You can close
up your "microphone test" and "configure" windows, you won't need them
any more.
Important note: As of this writing, there are bugs in the KGS audio
system that you should be aware of. Some people report that they can
record once, but if they stop recording and start again, they hear only static.
If this happens to you, then after each "Start Recording"/"Play Back" loop
you will have to completely exit from CGoban and restart. Later versions of
java seem to be better about this, so you may want to try upgrading if you
run into this problem.
Using Live Audio In a Game
The Audio Control Check Box
Once you have tested the live audio system, you are ready to use it!
First, set up a teaching game. It may be any of the
editable game types, but you can
not use live audio in a simul game, free game, ranked game, or tournament
game.
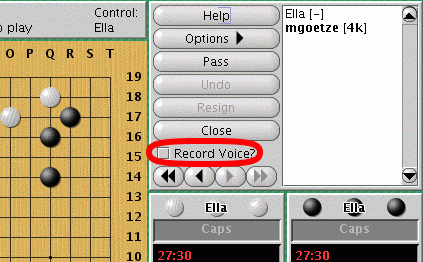
Find the "Record Voice?" checkbox (see the picture on the right). This
only appears when your account is set as a teacher, and you are the "owner"
of the teaching game. The "owner" is always the person who created the
teaching game, so if your student sets the game up, you will not be able
to use live audio! Make sure you set the game up in every case.
Once you find the "record voice?" checkbox, check it! The text
"record voice" will be replaced by a black rectangle. This rectangle is
a level meter. It lets you
know when students hear you; try talking into the microphone, a green bar
should appear in the rectangle, it will move to match the volume of your
voice. As long as you see this bar moving when you talk, everything should
be going well! The bar also gives you a hint about whether your noise is
the right volume for your students. If the bar turns yellow, that's OK, but
if the bar is often red, then that means that the gain is your microphone is
turned up too high, your voice will not sound good. Go back to the
microphone test window, turn the gain down. You
can do this even while in the middle of your lesson, just don't press
the "Start Recording" button in the microphone test window!
If you want to turn off the audio for a little bit (for example to answer
a telephone call, or any other reason), just uncheck the box next to the
lever meter, the "Record voice?" text reappears, and students will not be able
to hear you talk until you turn your microphone back on again.
Important note: As of this writing, there are bugs in the KGS audio
system that you should be aware of. Some people report that they can
record once, but if they stop recording and start again, they hear only static.
If you turn off recording, then turn it back on, and your students complain
that they hear static, then you must completely close all CGoban windows
and restart it again. Only some people have this problem, so most teachers
don't have to worry about it. Later versions of java seem to be better about
this, so you may want to try upgrading if you run into this problem.
Fragmente
Die Audio-Kommentarfunktion steht Lehrern mit KGS-Plus Abonnement zur Verfügung. Die Möglichkeit, Audio-Kommentare zu hören ist aber üblicherweise auf eine bestimmte _Anzahl Zuhörer beschränkt_ [#]. Überschreitet die Zahl der Zuschauer bei einer Lektion die zulässige Menge, hören die übrigen Zuschauer keine Audiokommentare, und in ihrem Client wird "kein Audio" angezeigt. [PIC noAudio]
Wenn eine Lehrerin eine Lektion für zahlende (oder aus anderen Gründen bevorzugte) Schüler gibt, sollte sie die Lektion bei der Erstellung [newGameWin] als privat markieren [PIC] bzw. die sgf-Datei für die Lektion als "privat" hochladen [PIC] oder die Lektion in einem privaten Raum stattfindenlassen. Den gewünschten Schülern wird dann durch Einträge in die Zugangsliste [PIC] der Zugang zur Lektion gewährt. [WAS, WENN die Lehrerin z.B. nicht den Zugang zur Lektion beschränken will, aber die Audiokommentare auf eine bestimmte Gruppe Zuschauer begrenzen will? - öffentlichen Klon erstellen?]
Die Anzahl Schüler, die in den Genuß der Audiokommentare kommen können, richtet sich nach den in der FAQ von jyem angegebenen Preisen:
FAQ on group rates: (deactivated)
Edit this page (requires admin or translator privilege)